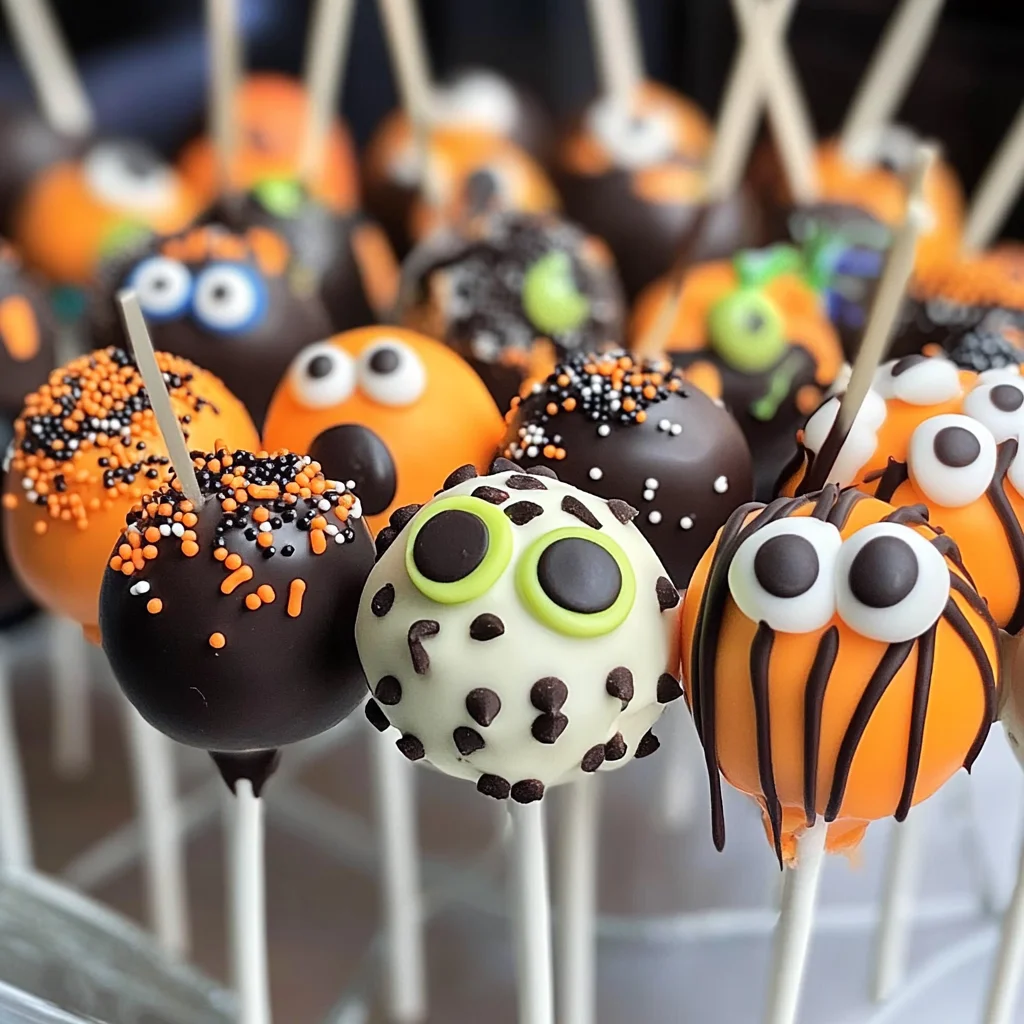
Halloween Cake Pops
If you’re looking for a fun and festive treat to share this Halloween, you’ve stumbled upon the perfect recipe! These Halloween Cake Pops are not just adorable; they’re a delightful mix of tender cake and fudgy frosting, all rolled into bite-sized pops and dipped in colorful chocolate. They make an excellent addition to any Halloween gathering or a sweet surprise for your loved ones. Plus, they’re so easy to make that you’ll want to whip them up for every occasion!
What makes these cake pops special is not just their taste but also the joy they bring when decorating them with playful designs. Grab the kids, let their creativity shine, and enjoy some quality time together while making these spooky treats!
Why You’ll Love This Recipe
- Easy to prepare: With just a handful of simple steps, you’ll have delicious cake pops ready in no time!
- Family-friendly fun: Decorating these cake pops can be a great activity for kids and adults alike—everyone loves getting creative!
- Perfect for parties: Whether it’s a Halloween bash or a cozy family night, these treats will be the highlight of any dessert table.
- Make-ahead convenience: You can prep the cake pops ahead of time, making party planning a breeze.
- Delicious flavor: The combination of chocolate fudge cake and creamy frosting makes every bite heavenly!

Ingredients You’ll Need
Let’s gather our ingredients! This recipe calls for simple, wholesome ingredients that are easy to find at your local grocery store. Here’s what you’ll need to make your Halloween Cake Pops:
For the Cake Mixture
- 15 ounces chocolate fudge cake mix (prepared in 9×13 dish)
- 1/2 cup butter
- 2 tablespoons shortening
- 1 cup powdered sugar
- 1/2 cup cocoa powder
- 1/2 teaspoon vanilla
- 2-3 tablespoons milk
For Decoration
- 8 ounces white candy melts
- 8 ounces orange candy melts
- 10 ounces green candy melts
- 10 ounces black candy melts
- 30 candy eyeballs
- 20 candy corn
- 10 heart sprinkles
- 40 lollipop sticks (6 inch)
- Piping bags (or you can use a ziplock bag and cut the corner)
Variations
This recipe is wonderfully flexible, allowing you to let your imagination run wild! Here are some ideas to mix things up:
- Change up the cake flavor: Try using vanilla or red velvet cake mix instead of chocolate for a different taste.
- Add some spices: Incorporate pumpkin spice or cinnamon into your frosting for a seasonal twist!
- Experiment with toppings: Swap out candy eyeballs and sprinkles for crushed cookies or nuts if you prefer.
- Make them gluten-free: Use gluten-free cake mix to accommodate dietary preferences.
How to Make Halloween Cake Pops
Step 1: Bake the Cake
Start by baking your chocolate fudge cake according to the package instructions in a 9×13 pan. Once it’s done, allow it to cool completely. This step is crucial because it helps the cake hold its shape when we turn it into pops!
Step 2: Prepare the Frosting
In a large bowl, combine butter, shortening, powdered sugar, cocoa powder, and vanilla. Add in milk, and mix everything on high for about 2-3 minutes until it’s smooth. This creamy frosting will help bind our crumbled cake together and add rich flavor.
Step 3: Crumble the Cake
Once your cake has cooled down, gently crumble it into fine crumbs in another bowl. Take your time with this step; it’s important that it resembles fine crumbs so that it mixes well with our frosting.
Step 4: Combine Cake and Frosting
Now comes the fun part! Gradually add small amounts of frosting into your crumbled cake mixture. Mix with your hands until everything is moist enough to hold together as a ball—this will ensure each pop is perfectly formed.
Step 5: Form the Cake Balls
Line a cookie sheet with parchment paper. Using a standard cookie scoop or your hands, form tight balls from the mixture and place them on the lined sheet. It’s like crafting little spooky treats!
Step 6: Prepare Lollipop Sticks
Melt about 1/4 cup of one type of candy melts in the microwave following package directions. Dip the tip of each lollipop stick into this melted chocolate before inserting it into each cake ball about three-quarters of the way in. This creates a strong bond between the stick and the pop.
Step 7: Chill & Decorate
Place your cookie balls in the freezer for about 30 minutes to firm up. Once they’re chilled, take them out and decorate with melted candy melts in various colors. Let your creativity flow as you create spooky designs!
These Halloween Cake Pops are sure to be a hit at any celebration! Enjoy!
Pro Tips for Making Halloween Cake Pops
Creating the perfect Halloween Cake Pops can be a delightful adventure! Here are some tips to ensure your cake pops turn out spooktacular.
- Use chilled cake: Starting with a chilled cake makes it easier to crumble and mix. A cooler temperature helps the frosting bind better, resulting in a firmer ball that holds its shape.
- Don’t overmix: Once you add the frosting to the crumbled cake, mix gently until it holds together. Overmixing can lead to dry cake pops that don’t stick well.
- Keep the coating thin: When dipping in chocolate, a thinner layer yields a prettier pop! Too much coating can lead to cracking as they set.
- Decorate while warm: Sprinkle your decorations onto the candy melts while they are still warm for better adhesion. This way, your eyeballs and sprinkles will stick without falling off!
- Experiment with flavors: Don’t hesitate to swap out some ingredients! You could use vanilla cake mix or even add flavored extracts for a unique twist on your Halloween Cake Pops.
How to Serve Halloween Cake Pops
Presentation is key when it comes to serving these festive treats! Here are some fun ideas to make them stand out at your Halloween gathering.
Garnishes
- Chocolate drizzle: A drizzle of melted chocolate over the top adds an elegant touch while enhancing flavor.
- Sprinkles: Use seasonal sprinkles, like pumpkins or ghosts, for an extra festive flair. They not only look great but also add a bit of crunch!
Side Dishes
- Mummy Hot Dogs: Wrap hot dogs in crescent roll dough and bake until golden. These cute mummies are sure to be a hit alongside your cake pops.
- Pumpkin Soup: A warm bowl of creamy pumpkin soup is perfect for cooling autumn nights and complements the sweet treats beautifully.
- Spooky Veggie Platter: Arrange seasonal veggies like carrots, cucumbers, and bell peppers in fun shapes and serve with a tasty dip. This offers a fresh contrast to sweet treats.
- Witch’s Brew Punch: Create a spooky drink with green soda and floating gummy worms or eyeballs; it’s both creepy and refreshing!
With these tips and serving suggestions, you’re all set to impress your friends and family this Halloween season! Enjoy making these delightful Halloween Cake Pops, and may they bring joy (and maybe just a little fright) to your holiday celebrations!
Make Ahead and Storage
These Halloween Cake Pops are not only delightful treats for your spooky celebrations, but they also make for fantastic meal prep options. You can whip them up ahead of time and store them, making it easy to enjoy these sweet bites throughout the Halloween season!
Storing Leftovers
- Place any leftover cake pops in an airtight container.
- Store in a cool, dry place for up to 5 days.
- If you live in a warmer climate, consider refrigerating them to keep them fresh longer.
Freezing
- Allow the cake pops to cool completely before freezing.
- Wrap each cake pop individually in plastic wrap or place them in a single layer in an airtight container.
- Freeze for up to 2 months. When ready to eat, just let them thaw at room temperature for about 30 minutes.
Reheating
- These cake pops are best enjoyed at room temperature.
- Simply take them out of the fridge or freezer and allow them to sit at room temperature for about 30 minutes before serving.
FAQs
Here are some common questions about making Halloween Cake Pops:
Can I use different flavors for Halloween Cake Pops?
Absolutely! Feel free to explore other cake flavors like vanilla, red velvet, or even spice cake. Just make sure they complement the frosting and candy melts you choose.
How do I decorate my Halloween Cake Pops?
You can get creative with decorations! Use different colored candy melts, sprinkles, or even edible glitter to make your Halloween Cake Pops festive and fun. Remember, the more colorful and spooky, the better!
Can I make Halloween Cake Pops ahead of time?
Yes! You can prepare these cake pops a few days in advance or freeze them for later enjoyment. This makes them perfect for parties or gatherings.
How should I store my Halloween Cake Pops?
Store your leftover cake pops in an airtight container at room temperature or in the refrigerator if it’s warm outside. They’ll stay fresh for several days!
Final Thoughts
I hope you find joy in creating these delightful Halloween Cake Pops! They are not only delicious but also a fantastic way to celebrate the spooky season with friends and family. Enjoy experimenting with different designs and flavors as you bring a smile to everyone’s face this Halloween. Happy baking!
Halloween Cake Pops

Get ready to indulge in the ultimate Halloween treat with these delightful Halloween Cake Pops! Perfectly crafted from rich chocolate cake and creamy frosting, each bite-sized pop is dipped in vibrant candy melts and adorned with playful decorations. These spooky treats are not only fun to make but also provide a great opportunity for family bonding. Whether you’re hosting a Halloween party or simply want to surprise your loved ones, these colorful cake pops will steal the show and satisfy every sweet tooth.
- Prep Time: 30 minutes
- Cook Time: 25 minutes
- Total Time: 55 minutes
- Yield: Approximately 40 servings 1x
- Category: Dessert
- Method: Baking
- Cuisine: American
Ingredients
- 15 ounces chocolate fudge cake mix
- 1/2 cup butter
- 2 tablespoons shortening
- 1 cup powdered sugar
- 1/2 cup cocoa powder
- 1/2 teaspoon vanilla
- 2–3 tablespoons milk
- 8 ounces white candy melts
- 8 ounces orange candy melts
- 10 ounces green candy melts
- 10 ounces black candy melts
- 30 candy eyeballs
- 20 candy corn
- 10 heart sprinkles
- 40 lollipop sticks (6 inch)
Instructions
- Bake the chocolate fudge cake according to package directions in a 9×13 dish. Allow it to cool completely.
- In a bowl, beat together the butter, shortening, powdered sugar, cocoa powder, and vanilla until smooth. Gradually add milk until desired consistency is achieved.
- Crumble the cooled cake into fine crumbs and mix with the frosting until well combined.
- Form the mixture into tight balls and place them on a parchment-lined cookie sheet.
- Melt some candy melts and dip lollipop sticks into it before inserting them into the cake balls for stability.
- Freeze pops for about 30 minutes, then dip in colored candy melts and decorate as desired.
Nutrition
- Serving Size: 1 cake pop (45g)
- Calories: 170
- Sugar: 18g
- Sodium: 90mg
- Fat: 7g
- Saturated Fat: 4g
- Unsaturated Fat: 3g
- Trans Fat: 0g
- Carbohydrates: 24g
- Fiber: <1g
- Protein: 2g
- Cholesterol: 20mg