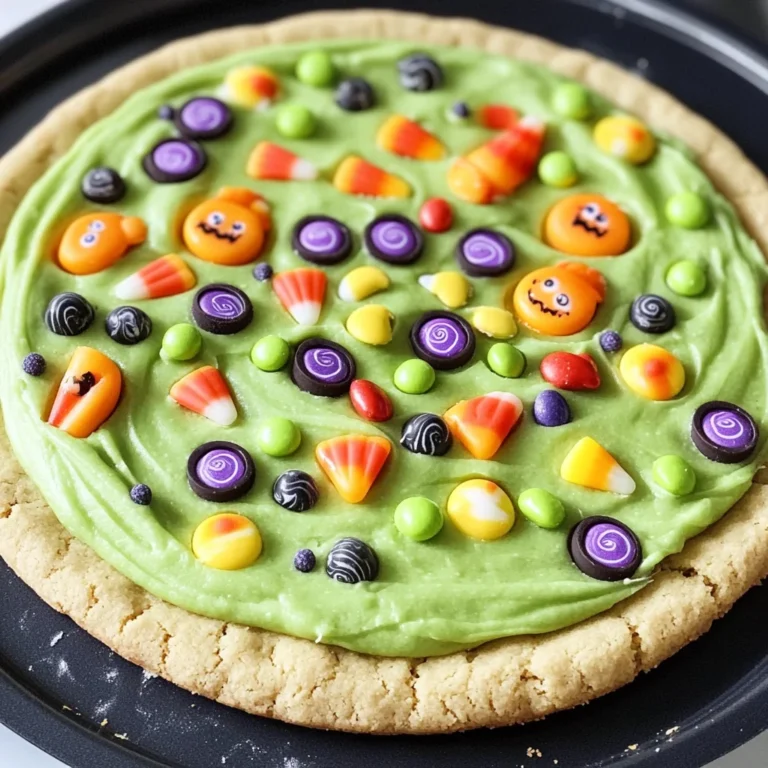
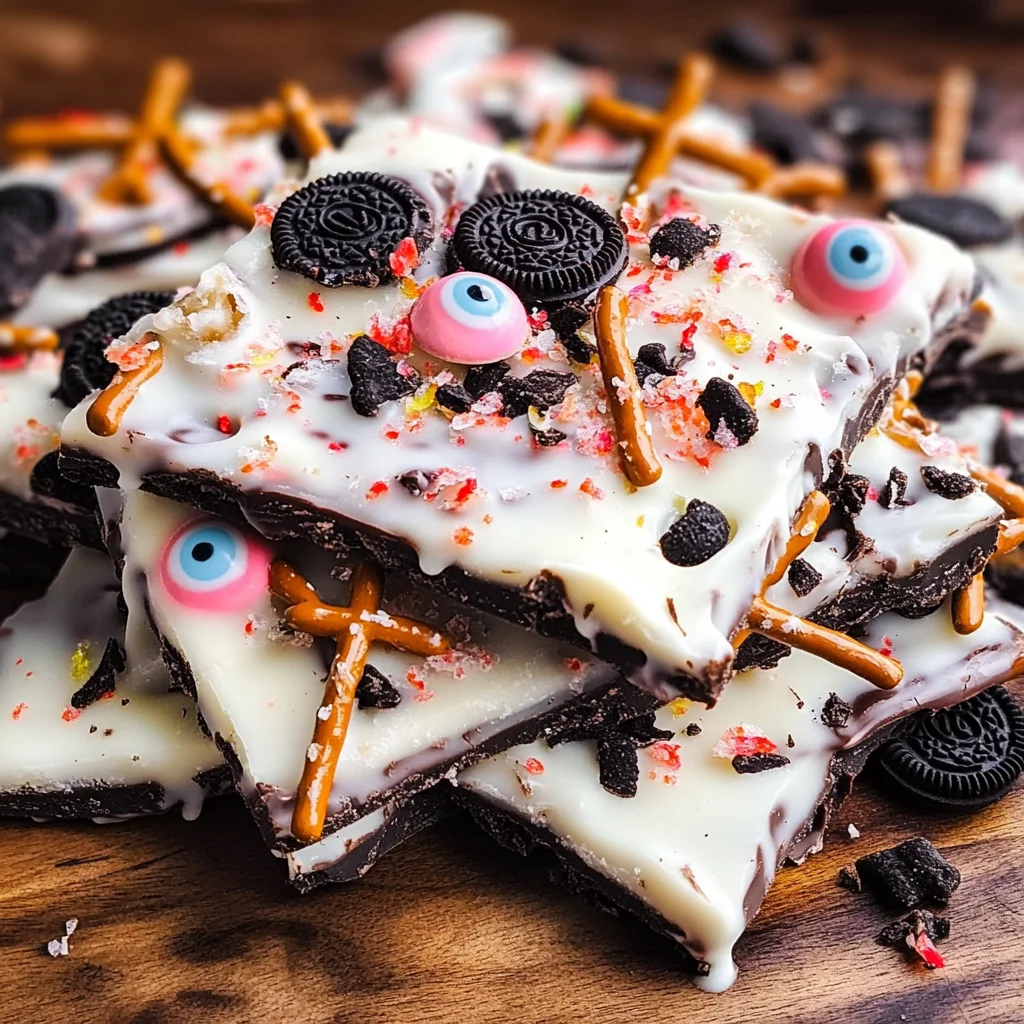
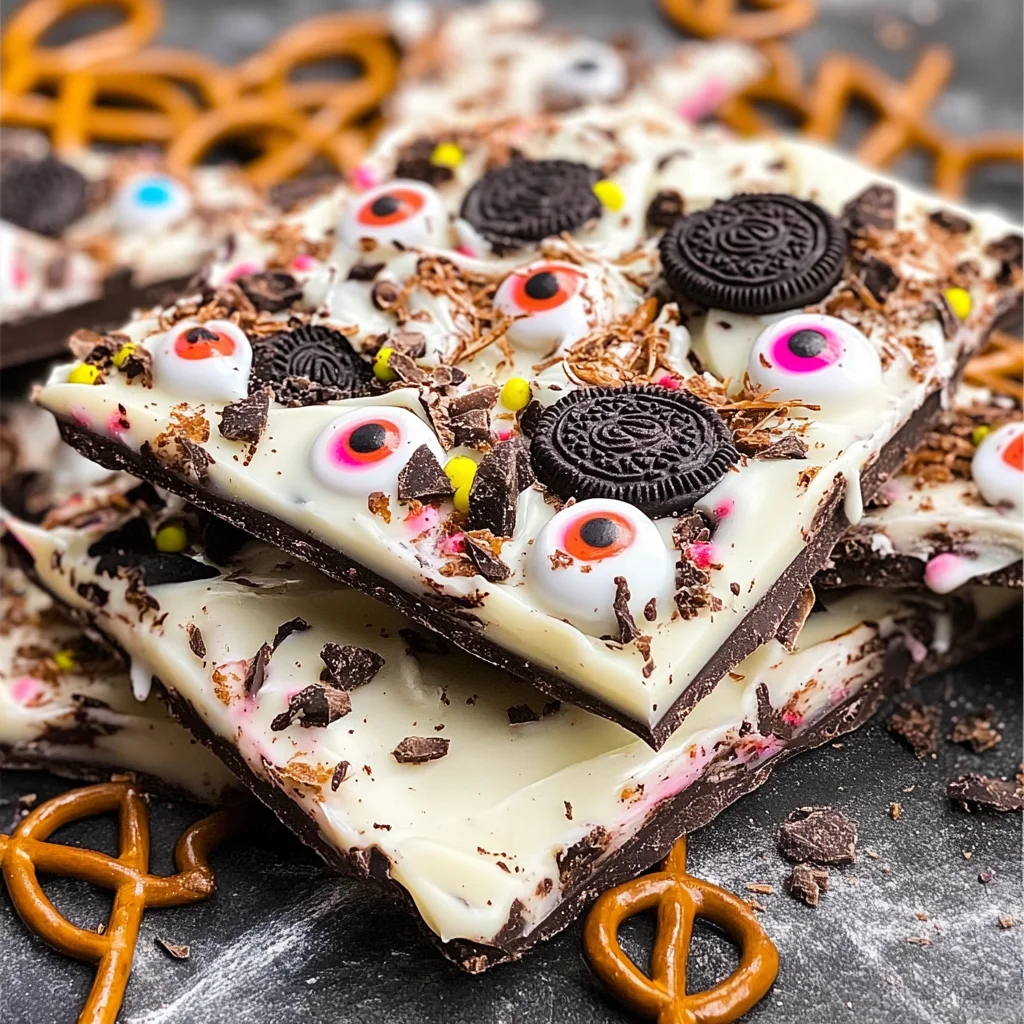
Graveyard Bark
If you’re looking for a fun and easy treat to whip up this Halloween, then look no further! Graveyard Bark is one of my all-time favorite recipes, and it’s perfect for getting the kids involved in the kitchen. Not only is it deliciously sweet and crunchy, but it also brings a bit of spooky fun to your holiday celebrations. Whether you’re having a family gathering or just want something special for movie night, this treat will surely be a hit!
This recipe is so simple that even little hands can help out. Plus, it’s colorful and festive, making it an ideal dessert for Halloween parties or classroom celebrations. Let’s dive into why you’ll love making Graveyard Bark!
Why You’ll Love This Recipe
- Quick to Make: This recipe requires just about 20 minutes of your time, making it perfect for busy nights.
- Kid-Friendly Fun: Get your little ones involved! They will love mixing and adding their favorite toppings.
- Flexible Ingredients: You can easily customize this bark with different candies or toppings based on your preferences.
- Perfect for Sharing: With 20 servings, there’s plenty to go around for parties or treats for friends!
- Delicious Flavor: Combining chocolate, pretzels, and marshmallows results in a delightful mix of sweet and salty.
Ingredients You’ll Need
Let’s gather our ingredients! This recipe uses simple, wholesome items that you probably already have in your pantry. Here’s what you need to make your spooky Graveyard Bark:
For the Base
- 20 pretzel sticks (whole)
- ½ cup mini vegan marshmallows
- 1 cup white chocolate candy melts (melted)
- red food coloring (optional)
- 22 ounces milk chocolate bars
- 1 tablespoon solid vegetable shortening
For the Toppings
- ¼ cup pretzel sticks (roughly chopped)
- candy eyes
- ½ cup Oreo cookies (crushed)
Variations
One of the best parts about Graveyard Bark is how flexible it can be! Feel free to get creative and try out these variations:
- Add Different Candies: Swap out the candy eyes for gummy worms or spooky candies for a different twist!
- Change the Chocolate: Use dark chocolate instead of milk chocolate for a richer flavor that pairs wonderfully with the sweetness.
- Mix in Nuts: Add some chopped nuts like almonds or peanuts for an extra crunch.
- Use Different Cookies: Instead of Oreos, try crushed graham crackers or any other favorite cookies!
How to Make Graveyard Bark
Step 1: Melt the Chocolate
Start by melting your milk chocolate bars along with the solid vegetable shortening in a microwave-safe bowl. Heat in short bursts of 30 seconds, stirring after each interval until smooth. This step is crucial because the shortening helps thin out the chocolate, making it easier to spread later.
Step 2: Prepare Your Base
Once melted, pour half of the chocolate mixture onto a parchment-lined baking sheet and spread it evenly using a spatula. Sprinkle mini vegan marshmallows on top while it’s still warm so they can stick nicely.
Step 3: Create Layers
Next, drizzle some of the melted white chocolate over the marshmallows. If you want to add some festive flair, mix in a few drops of red food coloring into the melted white chocolate before drizzling—it gives a fun Halloween vibe!
Step 4: Add Toppings
Now it’s time to get creative! Sprinkle roughly chopped pretzel sticks and crushed Oreo cookies over the top. Finish off with candy eyes scattered throughout—these little guys will make your bark look extra spooky!
Step 5: Chill and Break Apart
Pour the remaining melted milk chocolate over everything and gently spread it out again. Place your baking sheet in the refrigerator for about 2 hours until set completely. Once firm, break into pieces and enjoy!
Making Graveyard Bark is not just easy; it’s also an enjoyable experience that brings everyone together—perfect for Halloween festivities! Happy snacking!
Pro Tips for Making Graveyard Bark
Making Graveyard Bark is a fun and rewarding experience, especially when you involve the little ones in the kitchen! Here are some tips to enhance your bark-making adventure:
-
Use Quality Ingredients: Opt for high-quality chocolate and candy melts for a smoother texture and richer flavor. Better ingredients lead to a tastier treat that everyone will love.
-
Melt Chocolate Slowly: When melting your chocolate, do it over low heat or in short bursts in the microwave. This prevents burning and ensures a silky-smooth consistency, which is perfect for coating your ingredients.
-
Customize Your Decorations: Feel free to get creative with your toppings! Add gummy worms or different types of candy to make your bark even more festive and personalized. This is where the kids can really let their imaginations run wild!
-
Cool Properly: Once your bark is ready, allow it to cool completely at room temperature before cutting. This helps it set properly, making it easier to slice into perfect pieces without crumbling.
-
Store Correctly: To keep your Graveyard Bark fresh, store it in an airtight container at room temperature. This way, it remains deliciously crunchy for days!
How to Serve Graveyard Bark
Presenting your Graveyard Bark can be just as fun as making it! Here are some creative serving ideas that will impress both kids and adults alike.
Garnishes
- Sprinkles: Use Halloween-themed sprinkles to add color and a festive touch to your bark.
- Chocolate Drizzle: A quick drizzle of melted chocolate over the top can create an eye-catching design while adding extra sweetness.
Side Dishes
- Pumpkin Spice Popcorn: This sweet and spicy popcorn is easy to make and adds a cozy fall flavor that pairs perfectly with your bark.
- Apple Slices with Nut Butter: Crisp apple slices dipped in creamy nut butter offer a refreshing crunch that balances out the sweetness of the dessert.
- Carrot Sticks with Hummus: A healthy option that provides a nice crunch alongside your treats, making for a well-rounded snack display.
- Chili: A warm bowl of vegetarian chili can serve as a delightful contrast to the sweet bark, turning dessert into part of a fun Halloween party spread!
With these tips and serving suggestions, your Graveyard Bark will be the highlight of any Halloween gathering! Enjoy creating this spooky treat together with family and friends.
Make Ahead and Storage
This Graveyard Bark is not only a fun Halloween treat but also perfect for meal prep! You can whip it up ahead of time and store it for later enjoyment.
Storing Leftovers
- Store any leftover bark in an airtight container.
- Keep it at room temperature for up to one week.
- If you live in a warm climate, consider refrigerating to maintain its shape.
Freezing
- Wrap pieces of the bark individually in plastic wrap or wax paper.
- Place them in a freezer-safe bag or container.
- Freeze for up to three months. When ready to enjoy, let it thaw at room temperature.
Reheating
- There’s no need to reheat this treat; simply enjoy it as is!
- If the bark has been refrigerated, allow it to come back to room temperature before serving for the best texture.
FAQs
Have some questions about making Graveyard Bark? Here are some common ones!
What is Graveyard Bark?
Graveyard Bark is a fun and festive dessert that combines chocolate, pretzels, and candy to create a delicious Halloween-themed treat. It’s easy to make and perfect for kids!
Can I customize my Graveyard Bark?
Absolutely! Feel free to add your favorite candies or nuts. Just ensure any additions align with dietary preferences and restrictions.
How long does Graveyard Bark last?
When stored properly, Graveyard Bark can last up to one week at room temperature or three months in the freezer.
Final Thoughts
I hope you have as much fun making this Graveyard Bark as I do! It’s a delightful treat that brings everyone together during Halloween festivities. Don’t hesitate to get creative with your toppings and personalize it to your taste. Enjoy making memories in the kitchen, and happy haunting!
Graveyard Bark

Get ready for a spooktacular treat this Halloween with our delightful Graveyard Bark! This easy-to-make dessert combines the sweetness of chocolate with the crunch of pretzels and the fun of festive toppings, making it a hit for kids and adults alike. In just about 20 minutes, you can whip up this colorful snack that’s perfect for parties, movie nights, or classroom celebrations. Involving your little ones in the kitchen adds to the fun as they mix and decorate their own creations. Customize it with various candies and toppings to suit everyone’s tastes, ensuring that each piece is as unique as it is delicious. Let’s dive into this hauntingly good recipe!
- Prep Time: 10 minutes
- Cook Time: 10 minutes
- Total Time: 20 minutes
- Yield: Approximately 20 servings 1x
- Category: Dessert
- Method: Baking
- Cuisine: American
Ingredients
- 20 pretzel sticks (whole)
- ½ cup mini vegan marshmallows
- 1 cup white chocolate candy melts (melted)
- red food coloring (optional)
- 22 ounces milk chocolate bars
- 1 tablespoon solid vegetable shortening
- ¼ cup pretzel sticks (roughly chopped)
- candy eyes
- ½ cup Oreo cookies (crushed)
Instructions
- Melt milk chocolate bars and solid vegetable shortening together in short bursts in a microwave until smooth.
- Pour half of the melted chocolate onto a parchment-lined baking sheet and spread evenly; top with mini vegan marshmallows.
- Drizzle melted white chocolate over marshmallows; add red food coloring for a spooky look if desired.
- Sprinkle chopped pretzel sticks, crushed Oreos, and candy eyes over the mixture.
- Pour remaining melted milk chocolate on top; spread gently.
- Chill in the refrigerator for about 2 hours until set, then break into pieces.
Nutrition
- Serving Size: 1 piece (40g)
- Calories: 190
- Sugar: 20g
- Sodium: 90mg
- Fat: 8g
- Saturated Fat: 5g
- Unsaturated Fat: 2g
- Trans Fat: 0g
- Carbohydrates: 29g
- Fiber: 1g
- Protein: 2g
- Cholesterol: 0mg