Halloween Charcuterie Board
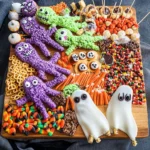
Get ready to impress your guests with a vibrant and spooky Halloween Charcuterie Board! This delightful display is perfect for any Halloween gathering, combining a variety of colorful treats that cater to all ages. With easy-to-follow steps, this fun project allows everyone to join in on the festive spirit, making it an ideal centerpiece for parties, movie nights, or family gatherings. From chocolate-dipped monsters to sweet candies, this board is not just visually stunning but also packed with flavors that will delight your taste buds. Let’s dive into the fun of assembling this festive snack board!
- Prep Time: 30 minutes
- Cook Time: 10 minutes
- Total Time: 40 minutes
- Yield: Serves approximately 10 people 1x
- Category: Dessert
- Method: Assembly
- Cuisine: American
Ingredients
Scale
- 8 rice krispie treats
- 5 ounces white chocolate melting wafers
- purple food dye
- candy eyes
- purple sprinkles
- 8 pretzel rods
- 10 ounces white chocolate melting wafers
- green food dye
- sliced almonds
- 8 Nutter Butter cookies
- 5 ounces white chocolate melting wafers
- mini chocolate chips
- 8 Mini Reese's Cups
- 8 Oreo Thins
- candy eyes
- 18 ounces Smarties
- 16 ounces red licorice
- 15 ounces Assorted Hershey's Candy
- 28 ounces sour pectin-based gummy candies
- 40 ounces candy corn
Instructions
- To start your spooky creations, melt the white chocolate melting wafers according to package instructions. Once melted, mix in purple food dye until you achieve your desired color. Dip one side of each Rice Krispie treat into the melted chocolate and place candy eyes on top. Finish by sprinkling purple sprinkles to mimic hair! Lay them on parchment paper and let the chocolate set.
- Melt additional white chocolate wafers and stir in green food dye. Pour the melted mixture into a tall cup for easy dipping. Dip each pretzel rod into the green chocolate then place sliced almonds at the tip to resemble fingernails. Set these aside to harden on parchment paper.
- Melt more white chocolate wafers and dip one side of each Nutter Butter cookie into the mixture. Place two mini chocolate chips as eyes and one for a mouth before allowing them to set on parchment paper.
- Unwrap Mini Reese's Cups without removing their inner lining. Open each Oreo cookie carefully, scrape out the cream filling, and break each cookie in half for wings. Spread some of that cream filling onto the Reese's Cup base, attach the cookie halves as wings, using more cream filling to secure candy eyes.
- Place a skeleton diagonally across your serving board as the centerpiece. Stuff its rib cage with assorted candies; this adds an extra surprise element.
- Finally, arrange all your larger decorated treats around the skeleton, filling any open spaces with even more candy goodness. Don’t be shy—make it colorful and inviting!
Nutrition
- Serving Size: 1 serving
- Calories: 320
- Sugar: 35g
- Sodium: 90mg
- Fat: 15g
- Saturated Fat: 8g
- Unsaturated Fat: 6g
- Trans Fat: 0g
- Carbohydrates: 43g
- Fiber: 2g
- Protein: 3g
- Cholesterol: 0mg
Find it online: https://simpleeatsdaily.com/halloween-charcuterie-board/