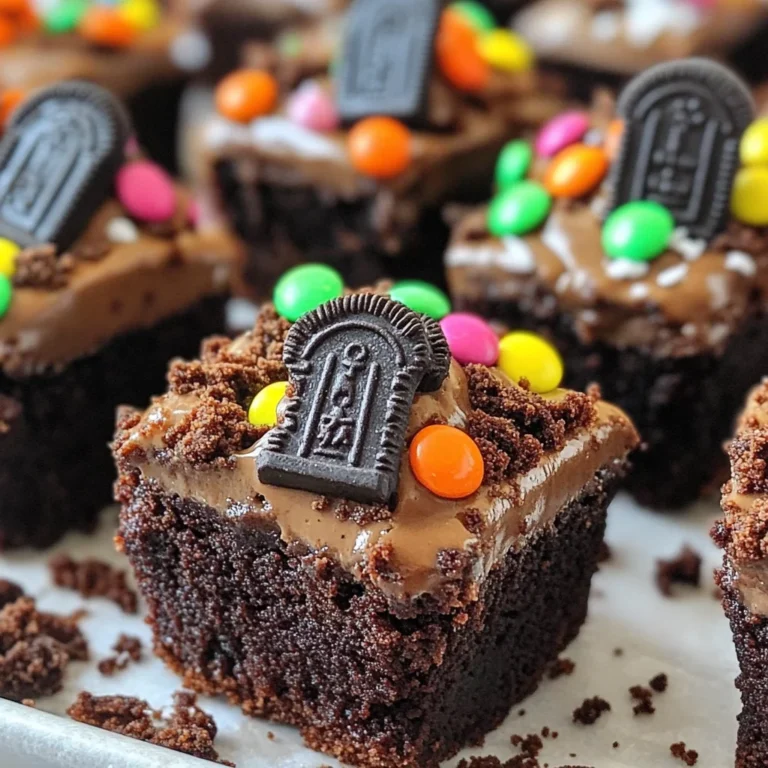
Halloween Mummy Oreo Cookies
If you’re looking for a fun and festive treat to celebrate Halloween, you’ve come to the right place! These Halloween Mummy Oreo Cookies are not only super cute but also incredibly easy to make. Just imagine the smiles on your family’s faces when they see these spooky little mummies! Whether you’re hosting a Halloween party, preparing for a classroom celebration, or just want to add a little festive fun to your week, this recipe is sure to delight everyone.
What makes these cookies truly special is how simple they are. With just a few ingredients and minimal prep time, you can whip up a batch of these treats that are perfect for busy weeknights or family gatherings. Plus, kids will love helping out in the kitchen—these cookies are as fun to decorate as they are to eat!
Why You’ll Love This Recipe
- Quick and Easy: In just 30 minutes, you can have a delicious dessert ready to go!
- Family-Friendly Fun: Decorating these mummy cookies is an activity everyone can enjoy together.
- Customizable: Use your favorite Oreo flavor and get creative with different toppings!
- Perfect for Parties: These spooky treats are sure to be a hit at any Halloween gathering.
- No Special Tools Required: You don’t need fancy equipment—just a microwave and some patience!

Ingredients You’ll Need
Let’s talk about the ingredients! This recipe uses simple and wholesome items that you may already have in your pantry. You’ll be surprised by how easily they come together to create something so delightful!
- Oreo Sandwich Cookies (your fav flavor)
- 2 cups white chocolate melting wafers
- 2 tablespoons paramount crystals¹
- Royal icing eyes
Variations
This recipe is wonderfully flexible! Feel free to mix things up and make these Halloween Mummy Oreo Cookies your own. Here are some fun variation ideas:
- Try Different Oreos: Use mint, peanut butter, or even birthday cake-flavored Oreos for unique twists!
- Change Up the Chocolate: Instead of white chocolate, try using milk chocolate or dark chocolate for a different flavor profile.
- Add Sprinkles: Before the chocolate hardens, sprinkle some festive Halloween sprinkles on top for extra flair.
- Make Them Mini: Use mini Oreo cookies for bite-sized mummies that are perfect for parties!
How to Make Halloween Mummy Oreo Cookies
Step 1: Prepare Your Workspace
First things first, line a baking sheet with parchment paper or a Silpat mat. This will ensure that your cookies don’t stick and makes cleanup a breeze. Set it aside while you prepare the delicious coating!
Step 2: Melt the Chocolate
In a microwave-safe bowl, combine the white chocolate melting wafers with paramount crystals¹. Microwave them on medium heat for 30 seconds. Afterward, remove and stir slowly; repeat this process in 15-second increments until everything is beautifully melted. It’s important to stir gently so that the chocolate doesn’t seize up.
Step 3: Dip the Oreos
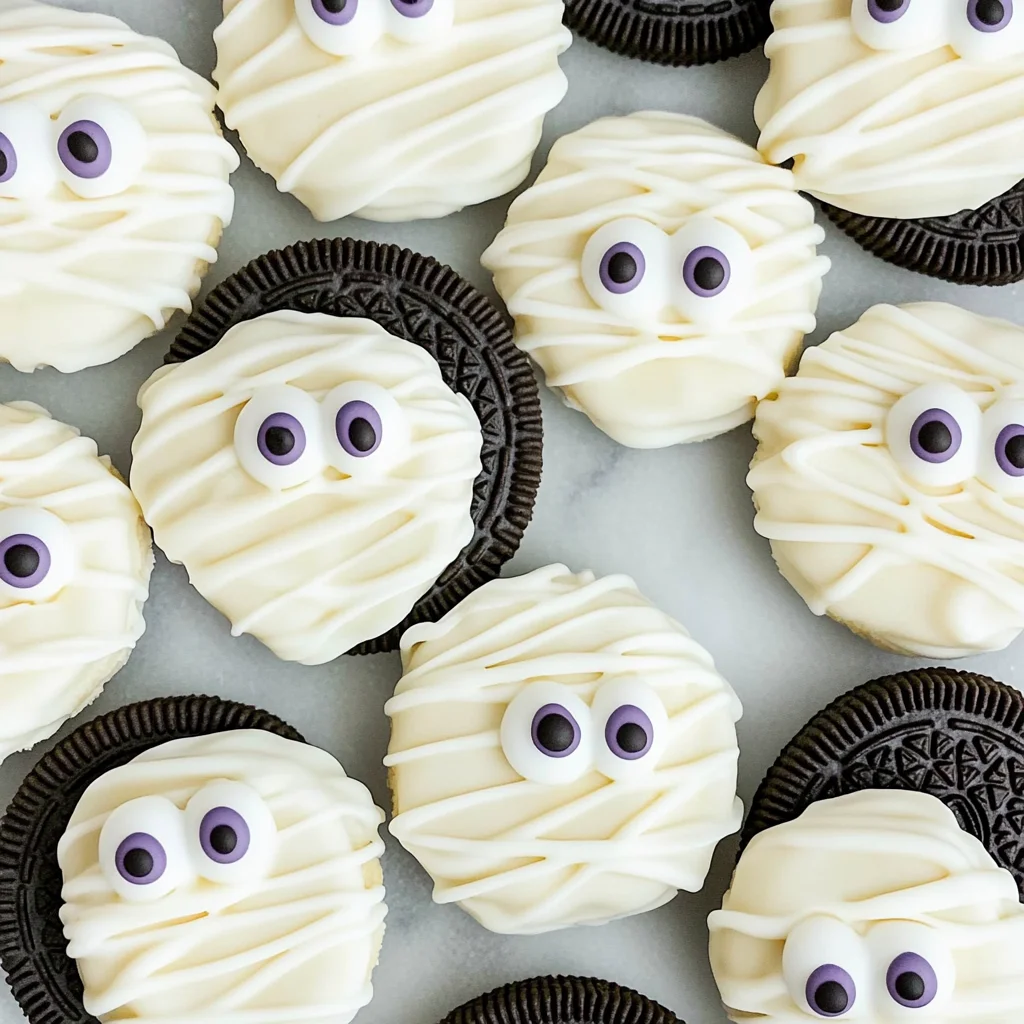
Now comes the fun part! Take your Oreo cookies and dip them into the melted white chocolate using a fork or dipping tool. Make sure to tap lightly on the edge of the bowl to remove excess chocolate before placing them on your lined baking sheet. Don’t forget to add royal icing eyes immediately so they stick nicely!
Step 4: Decorate Your Mummies
Once your cookies have set for a bit, pour any leftover melted chocolate into a decorating bag or sandwich bag. Snip off just the corner and pipe back-and-forth lines over each cookie—be careful not to cover those adorable eyes! After you’ve given each cookie its mummy wrap, let them sit until everything hardens.
And there you have it! Your very own Halloween Mummy Oreo Cookies—spooky, sweet, and oh-so-fun! Enjoy sharing these treats with friends and family as you embrace the spirit of Halloween!
Pro Tips for Making Halloween Mummy Oreo Cookies
Making Halloween Mummy Oreo Cookies is a delightful experience, and with these pro tips, you’ll impress your friends and family even more!
-
Choose Your Favorite Oreos: Using different flavors of Oreo cookies can add a fun twist to your mummies. Think about seasonal flavors like pumpkin spice or even mint for a unique taste.
-
Use Quality White Chocolate: Selecting high-quality melting wafers will ensure a smoother coating and better taste. Cheap chocolate can often seize up or not melt well, leading to frustration.
-
Let the Chocolate Cool Slightly: Allow melted white chocolate to cool for a minute before dipping. This helps prevent the cookies from becoming too soggy and keeps them crispy.
-
Be Generous with the Eyes: Don’t skimp on those royal icing eyes! They are what give your mummies character, making them look extra cute and spooky for Halloween.
-
Practice Your Piping Technique: If you’re new to piping, practice on parchment paper first. This will help you get comfortable with the pressure needed to achieve those mummy-like swirls without covering the eyes.
How to Serve Halloween Mummy Oreo Cookies
Presenting your Halloween Mummy Oreo Cookies can be just as fun as making them! Here are some creative ideas to make your treats stand out at any gathering.
Garnishes
- Sprinkles: Add some festive sprinkles around your cookies on the serving platter for an extra pop of color that matches the Halloween theme.
- Chocolate Drizzle: Use leftover melted white chocolate to create elegant drizzles over the cookies after they set for an enhanced visual appeal.
- Edible Glitter: A sprinkle of edible glitter can add a magical touch, making these cookies sparkle under party lights.
Side Dishes
-
Pumpkin Spice Cupcakes: These moist cupcakes topped with cream cheese frosting complement the flavors of Halloween and create a sweet balance alongside the cookies.
-
Caramel Apples: A classic fall treat! The crunchy apples paired with gooey caramel provide a refreshing contrast to the rich sweetness of the cookies.
-
Spooky Fruit Salad: Mix seasonal fruits like oranges, pomegranate seeds, and grapes to create a vibrant and healthful side that adds brightness to your dessert table.
-
Halloween-Themed Cheese Platter: Include an assortment of cheeses cut into festive shapes (like bats or pumpkins) along with crackers for a savory option that pairs wonderfully with sweets.
With these serving ideas, your Halloween Mummy Oreo Cookies will be the highlight of any festive gathering! Enjoy every bite, and happy haunting!
Make Ahead and Storage
These Halloween Mummy Oreo Cookies are not only fun to make but also perfect for meal prep! You can whip up a batch in advance and store them for later enjoyment, making them an ideal treat for Halloween gatherings or just a spooky snack at home.
Storing Leftovers
- Place any leftover cookies in an airtight container.
- Store at room temperature for up to 5 days.
- Avoid refrigerating, as this can cause the chocolate coating to become sticky.
Freezing
- Lay the cookies in a single layer on a baking sheet and freeze until solid.
- Transfer frozen cookies to a freezer-safe bag or container.
- Store in the freezer for up to 3 months. Thaw at room temperature before enjoying.
Reheating
- There’s no need to reheat these cookies; they taste best served at room temperature.
- If you want to refresh their look, simply drizzle a little melted white chocolate over them before serving.
FAQs
Here are some common questions you might have about making Halloween Mummy Oreo Cookies.
Can I use dark chocolate instead of white chocolate for my Halloween Mummy Oreo Cookies?
Absolutely! Dark chocolate will give your Mummy Oreo Cookies a richer flavor. Just ensure you adjust the melting time as needed since dark chocolate can melt differently than white.
How do I get the royal icing eyes to stick on my Halloween Mummy Oreo Cookies?
The melted white chocolate acts as an adhesive, so placing the royal icing eyes on while the chocolate is still wet will help them stay put once it hardens.
How long do Halloween Mummy Oreo Cookies stay fresh?
When stored properly in an airtight container at room temperature, these cookies can remain fresh for up to five days.
Can I add different decorations to my Halloween Mummy Oreo Cookies?
Definitely! Feel free to get creative with your decorations. You can use colored sprinkles or edible glitter for added flair!
What flavors of Oreos work best for Halloween Mummy Oreo Cookies?
While traditional vanilla Oreos are always a hit, feel free to experiment with seasonal flavors like pumpkin spice or mint! They’ll add a unique twist to your mummies.
Final Thoughts
I hope you enjoy making these adorable Halloween Mummy Oreo Cookies as much as I do! They’re not just a treat; they’re sure to bring smiles and fun into your kitchen and gatherings. Don’t hesitate to get creative with flavors and decorations—after all, that’s what makes baking such a delightful adventure! Happy baking, and may your Halloween be filled with sweet memories!
Halloween Mummy Oreo Cookies

Get ready to delight your family and friends with these adorable Halloween Mummy Oreo Cookies! Perfect for parties or cozy gatherings, these spooky treats are not only fun to make but also irresistibly tasty. With just a few simple ingredients, you can create an eye-catching dessert that will bring smiles to everyone’s faces. The kids will love helping out in the kitchen, making decorating a memorable family activity. Whether you’re hosting a Halloween bash or simply looking for a festive snack, this easy recipe is sure to impress!
- Prep Time: 15 minutes
- Cook Time: 15 minutes
- Total Time: 30 minutes
- Yield: Approximately 12 cookies 1x
- Category: Dessert
- Method: Baking
- Cuisine: American
Ingredients
- Oreo Sandwich Cookies (your favorite flavor)
- 2 cups white chocolate melting wafers
- 2 tablespoons paramount crystals
- Royal icing eyes
Instructions
- Prepare your workspace by lining a baking sheet with parchment paper.
- In a microwave-safe bowl, combine white chocolate melting wafers and paramount crystals. Heat in the microwave on medium for 30 seconds; stir and repeat in 15-second increments until fully melted.
- Dip Oreo cookies into the melted chocolate using a fork, tapping off excess before placing them on the lined baking sheet. Add royal icing eyes immediately.
- Pour leftover melted chocolate into a decorating bag and pipe back-and-forth lines over each cookie, avoiding the eyes. Let sit until hardened.
Nutrition
- Serving Size: 1 cookie (20g)
- Calories: 105
- Sugar: 10g
- Sodium: 20mg
- Fat: 6g
- Saturated Fat: 3g
- Unsaturated Fat: 3g
- Trans Fat: 0g
- Carbohydrates: 12g
- Fiber: 0g
- Protein: 1g
- Cholesterol: 0mg